By Orange Planer
Cast iron pans are amazing tools in the kitchen for three reasons:
- They are tough –
- They can take any heat you throw at them without affecting the pan; that makes them ideal for gas or electric stoves, campfires, or a grill (glass-topped stoves can be an exception),
- They can be dropped, hit, dragged, or run over and except for a scratch or two the pan will be undamaged,
- Taken care of, they will outlast you, your children, their children, and beyond
- They are dense so they retain heat, which is great for –
- Putting on grill marks,
- Caramelizing foods,
- Even and steady cooking, and finally
- A correctly “seasoned” cast iron pan is the most non-stick utensil you own.
What is “seasoning” when talking about cast iron pans?
To protect the cast iron from rust it needs to be coated in a material that can take high heat and is food-grade safe. That material is a neutral-smelling polyunsaturated oil heated past its smoke point. The process of laying down that material is called polymerization. It occurs when the polyunsaturated oil breaks down and reacts with the iron and joins with other polyunsaturated oil in the same state, forming long molecular chains. The result is a hard, smooth coating that is water-repellant and can withstand very high heats (well over 600 Fahrenheit (°F) or 315 Celsius (°C)) when cooking.
Unfortunately, the seasoning can be damaged by several things. It can be chipped off by whacking it with a metal utensil, scraped off with sharp objects, dissolved by soap or acid (such as tomatoes), or scrubbed off. If that happens oxygen can access the cast iron. The iron will react with the oxygen, forming FeO2 (iron oxide, called rust). Once the rust starts it will over time eat into the iron and destroy the pan. If you have ever seen a car overtaken by rust, that is what happens to damaged cast iron pans.
To repair the pan, four tasks must be done (with the author’s recommended ingredient list):
- Remove all the seasoning (see below for other methods of seasoning removal)
Ingredient: your oven and a vent to remove the smoke that may come from your oven.
- Remove the rust
Ingredients:
- A plastic container with tight-fitting lid that is wide and tall enough to submerge your pan(s),
- Several gallons of the cheapest white vinegar you can find (depending on your pans you won’t use it all),
- An equal amount of tap water,
- A toothbrush or scrub brush that looks like either of these and has plastic (not horsehair or metal) bristles,
 or
or 
- Two heavy-duty rubber kitchen gloves that go up to your elbow.
- Clean the pan thoroughly
Ingredients:
- Fine-grade steel wool embedded with soap,
- Dish soap (does not matter what kind),
- Several lint-free rags.
- Re-season the pan
Ingredients:
- A polyunsaturated oil (see below for which kind) that has a medium-high smoke point (around 375°F (190°C),
- Several lint-free rags or paper towels,
- A roll of aluminum foil.
1. Methods of Seasoning Removal
There are many methods and depending on how rusty your pan is you may decide to choose one or the other. The methods I have seen include:
- A potato and salt: Cut a potato in half the short way, add ¼ cup kosher salt to the pan, push the potato onto the salt, and sand the pan down until all the seasoning is gone (if your arms can handle it and you have the time, keep going to remove all the rust, too)
- Pros: cheap
- Cons: takes an enormous amount of effort and time
- Fine-grit sandpaper rated for metal applications: Sand the pan down until all the seasoning is gone
- Pros: cheap, somewhat faster than a potato and salt
- Cons: still takes an enormous amount of effort and time, also has the possibility of leaving uneven spots
- A wire wheel (a wheel fitted with short, thick wires that looks like a brush attached to either a hand-held drill or other hand-held tool): Run the wire wheel over the pan, being careful not to grind down the pan too much, until all the seasoning and rust is gone
- Pros: fast
- Cons: significantly expensive and there is the danger of damaging the shape and surface of the pan, not to mention yourself if you misuse the tool
- Chemicals: There are a variety of products on the market that will chemically react with anything on the iron (including the rust) and dissolve it into solution, leaving the pan ready for step 3
- Pros: almost no effort and very safe
- Cons: expensive – you will need to immerse the pan which means you need at least two gallons; slow – the process takes days to complete; cost: at least $20/gallon unless you find it on sale
- Oven cleaners: Place your pan in a large trash bag, wear heavy rubber gloves, spray the pan with the oven cleaner being careful not to inhale it or come in contact with it, close the bag with the opening under the pan, and wait 24 – 48 hours
- Pros: almost no effort
- Cons: hazardous to your health – these products use lye and are applied using a spray. Lye is extremely caustic. It will burn any tissues it touches if not washed off immediately. If you breathe the fumes or allow the cleaner to touch your skin, eyes, or mouth you may end up in the hospital and will definitely be calling your local poison control organization
- RECOMMENDED - Your oven: seasoning is mostly carbon and carbon can be burned off by using your oven on its cleaning cycle. One hour should be all that is necessary, but some ovens have a minimum cleaning cycle time. The author’s oven, for example, has low and high cycles that default to 3 and 4 hours, but can be set to 2.5 and 3 hours, respectively. If you don’t have an oven, placing your pan in the coals of a fire pit or in your charcoal grill overnight will also do the job.
- Pros: almost no effort
- Cons: cost of energy to heat your oven and pan, but energy has to be expended somewhere and this is a relatively minor quibble
Cautions on using your oven to remove seasoning
An oven cleaning cycle will heat to around 900°F (482°C). If you were to open the oven door during that time you would be severely burned, and you may set your house on fire. Anything not burned in the oven already may catch fire, further increasing the hazard. For these reasons, and others,
- Make sure you manually locked the oven, or verified that the oven will automatically lock,
- Do not be tempted to open the oven until the cycle is ended, the oven is cool, and the door has unlocked (whether manual or automatic),
- If you have a stove hood that absorbs smoke you may need to turn this on, or you can open your windows. (Author’s note: there doesn’t appear to be a smoke issue in my house.)
If you really need to examine the progress, the oven light will work. But, seriously, don’t bother looking because there’s nothing to see. It’s like watching grass grow.
2. Remove the Rust
None of the steps involved with removing seasoning remove all the rust. Fortunately, there is a cheap, safe, and easy method to removing rust from iron: white vinegar. After removing the seasoning, here’s what the test pan looked like:

 Seasoning removed, top and bottom
Procedure:
- Put on the rubber gloves.
- Put the pan in the plastic container.
- Pour one gallon of vinegar into the container, followed by a gallon of water; if the pan is submerged completely, stop there, if not, add another half-gallon of vinegar and a matching half-gallon of water until the pan is submerged.
- Wait 10 minutes.
- Scrub the pan all over with the brush; you will see rust coming off the pan.
 |
| Vinegar application and scrubbing (shown in sink for visual purposes) |
- If there is still rust on the pan put it back in the solution.
- Wait 10 minutes.
- Go back to step 5 and repeat until all rust has been removed.
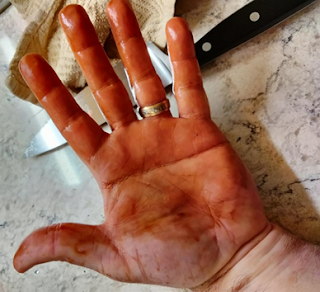 |
| Here is what your hands look like if you do not use rubber gloves |
You will know all the rust is gone when all you see is gray metal with no red anywhere.
3. Clean Thoroughly
We have all been taught to clean things with soap and water at the highest temperature we can withstand. Doing that with an iron pan will induce flash rust, necessitating a repeat of Step 2. Soap is not the enemy here: hot water is!
Procedure:
- Empty your sink and run the water until it is as cold as possible.
- Put the pan under the cold running water until it is also as cold as possible (a couple minutes will do).
- Stop the water, empty the pan, add a little dish soap, and use your scrub brush to thoroughly wash the pan of all vinegar and rust debris, then rinse with more cold water.
- The pan has been damaged by the action of rust and vinegar. That has created microscopic, jagged edges that will interfere with the formation of your seasoning and the non-stick properties thereof. The steel wool is used to smooth the jagged edges. Use the steel wool to scrub the pan using circular motions and plenty of effort. Do not worry about small pits; they will be filled in during the seasoning process.
- Rinse the pan using the scrub brush to remove any bits, then wash it at least twice with a little dish soap and the brush to make it is as clean as possible, then rinse with more cold water, scrubbing as you go; this excessive washing is to remove as much of the microscopic iron particles as possible
 |
| Washing after using steel wool |
- Dry the pan with a lint-free paper towel or cloth as fast as you can; if you see a significant amount of black on the towel, once more wash and rinse the pan thoroughly with the scrub brush, then dry again and examine for black particles. Repeat until there are none.
 |
| Result: clean pan! |
4. Re-seasoning the Pan
First, we need to talk about the right kind of oil for this purpose. What we need is a polyunsaturated oil whose chemical bonds will open during heating to form the polymers we need. While the author has seen many oils and fats recommended, his experience shows that only a few oils work well. These oils are (in order of preference):
- Grapeseed oil
- Sunflower oil
- Safflower oil
Not recommended (just a partial listing):
- Olive oil (not neutral smelling)
- Canola oil (smoke point is too high, leading to excessive electric or gas use)
- Lard (not polyunsaturated)
- Shortening (not polyunsaturated)
- Butter (not polyunsaturated)
Process
- Fold the corners of a long sheet of aluminum foil to create a tray and put in the bottom of your oven to catch any drips.
Preheat your oven to 200°F (93°C) and place the pan in the oven for 10 minutes. This will expand the iron so it will more readily accept oil and evaporate any remaining water.
Using hot pads, remove the pan and place it on the stove. (Put on a rack if you have a glass-top stove.) Raise the oven temperature to 300°F (148°C).
Apply 1 teaspoon of oil to the pan and spread using a paper towel or lint-free cloth, moving in concentric circles, then take a fresh paper towel or cloth and wipe up all the residue. Repeat on the bottom and handle with another 1 teaspoon of oil. The pan will look nearly dry and that is exactly what you want – a microscopically thin layer.
When the oven is at temperature put the pan upside down in the oven for 10 minutes, then remove and place on your stove. The oil will become more mobile when hot and this gives you the opportunity to remove any excess.
Raise the oven temperature to 450°F (232°C); when the oven reaches that temperature return the pan to the oven (upside down again) and bake for one hour. If you wish, apply a second coat of oil and repeat baking for an hour.
Turn off the heat and let the pan cure in the oven until all is cool.


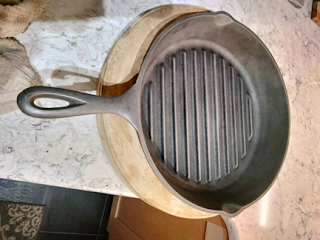
Seasoned pan, top and bottom
And, now that you're done, you can display your fine work!
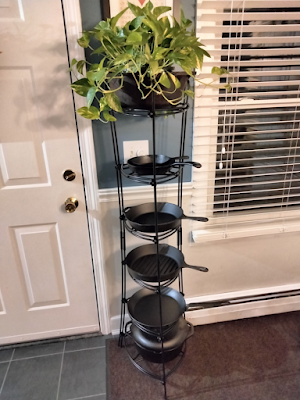 |
| Collection of pans on display in decorative rack |
Final Notes
Cleaning
After using your pan, simply wipe out whatever is there while the pan is warm and store it.
If food is stuck to the surface the gentle use of warm (not hot) water and a non-abrasive scraping tool, scrub brush, sponge, or cloth will remove the food, then dry, coat the entire pan with ¼ teaspoon of your oil, and store it.
Soap will dissolve the seasoning, so do not use it unless absolutely necessary.
Storing
After the initial seasoning or after cleaning from use, wipe down the inside of the pan with ¼ teaspoon of the oil used to create the seasoning using a paper towel or lint-free cloth. Then, put it away.
Seasoning toughness
Initially the seasoning will be very thin, so the pan won’t look particularly dark. Used frequently and with extended periods of exposure to fat and heat, additional patches of seasoning will be laid down. As this process continues the pan will look a little splotchy, but this is what you want. Over time, each layer of seasoning will overlap the others, locking the seasoning into a hard, long-lasting layer.
Using cast iron on glass cooktops
No matter how smooth the bottom of your cast iron pan is, do not slide it on a glass cooktop. If the bottom of the pan is not smooth and slick feeling, do not use it on a glass cooktop. Do not use a cast iron pot on glass cooktops because the weight will damage the surface. Some cast iron pots, with lid, weigh in excess of 20 lbs. (9.1 kg).